HAWKmedical Software

Mark UDI. Check content automatically.

VisionControlUDI brings together order data, laser marking and camera-based inspection in one interface. From the scanned order to the documented inspection result, keep track of content, serial numbers and workpieces.

With HAWKmedical, make UDI marking clear and repeatable: load job specifications, generate dynamic content, mark parts, and inspect both codes and human-readable text. Once configured, mappings reduce recurring manual input and simplify switching between marking orders.

Your benefits: a central order overview, GS1 and HIBC configuration, individual and grid marking, and DMC and OCR inspection using workpiece-specific expected values.
Mark UDI. Check content automatically.

VisionControlUDI brings together order data, laser marking and camera-based inspection in one interface. From the scanned order to the documented inspection result, keep track of content, serial numbers and workpieces.

With HAWKmedical, make UDI marking clear and repeatable: load job specifications, generate dynamic content, mark parts, and inspect both codes and human-readable text. Once configured, mappings reduce recurring manual input and simplify switching between marking orders.

Your benefits: a central order overview, GS1 and HIBC configuration, individual and grid marking, and DMC and OCR inspection using workpiece-specific expected values.

UDI marking linked to each workpiece

UDI stands for Unique Device Identification: the unique identification of medical devices. It combines the device identifier (UDI-DI) with production information (UDI-PI), such as batch, serial number and date.

VisionControlUDI brings this information together during marking. A machine-readable DataMatrix code and human-readable text support the identification and traceability of your products. The subsequent inspection compares the captured content with the expected values for each workpiece.
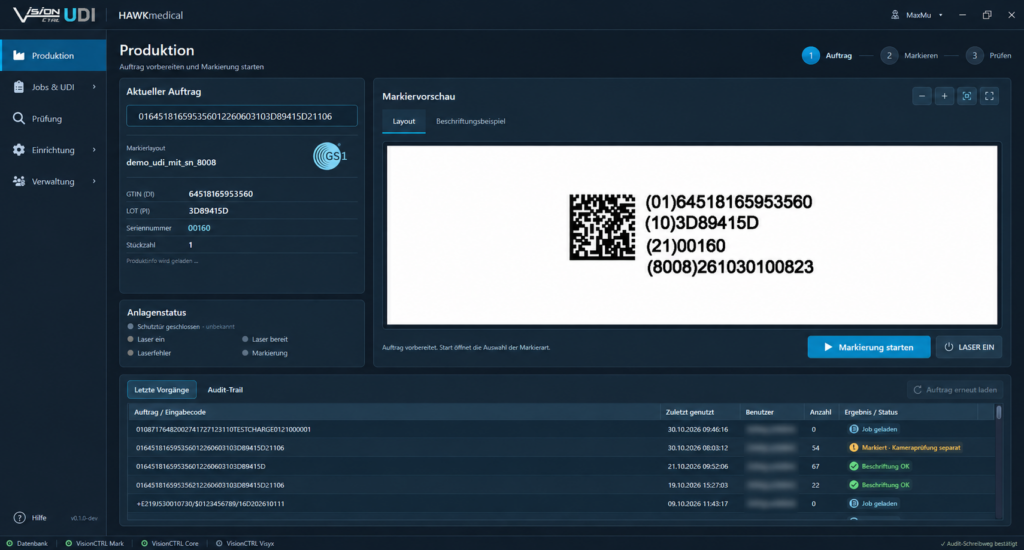
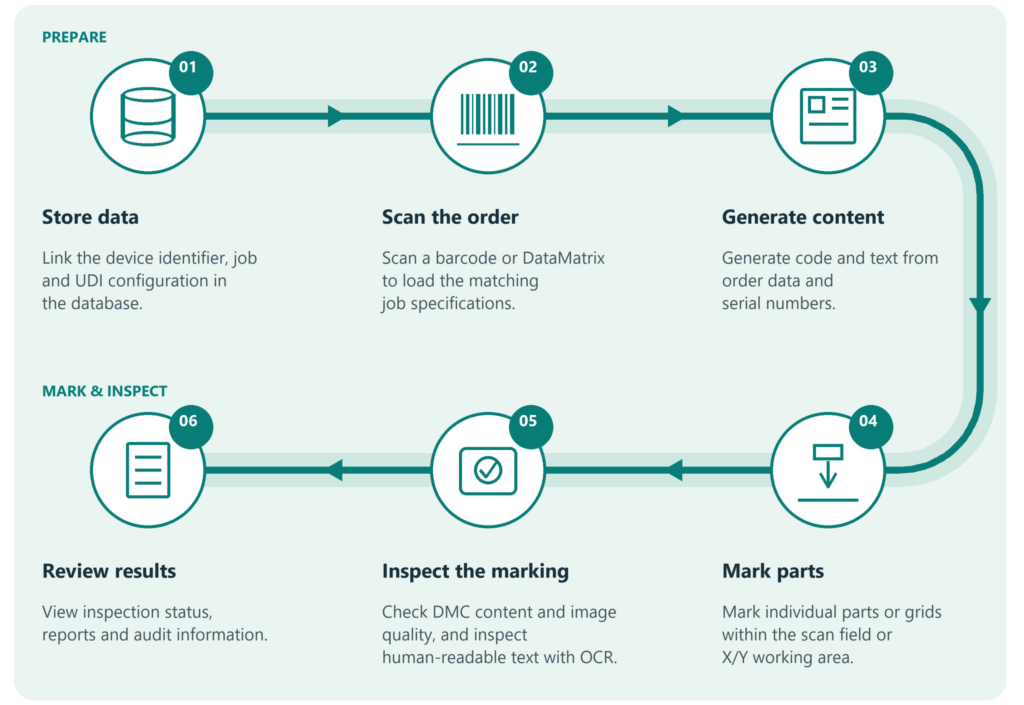
From order to inspected workpiece

Clear job specifications link marking content and inspection rules, creating a consistent workflow in which changing serial numbers remain assigned to the corresponding workpiece.
01

Store your data

Link the device identifier, marking job and UDI configuration in the database. Set up recurring specifications once in a structured format.
02

Scan the order

Read a barcode or DataMatrix code. The database mapping loads the appropriate job and transfers the order values.
03

Generate the content

Create DataMatrix codes and human-readable text from order data and serial numbers. View the device identifier, batch, job and marking preview together.
04

Mark the parts

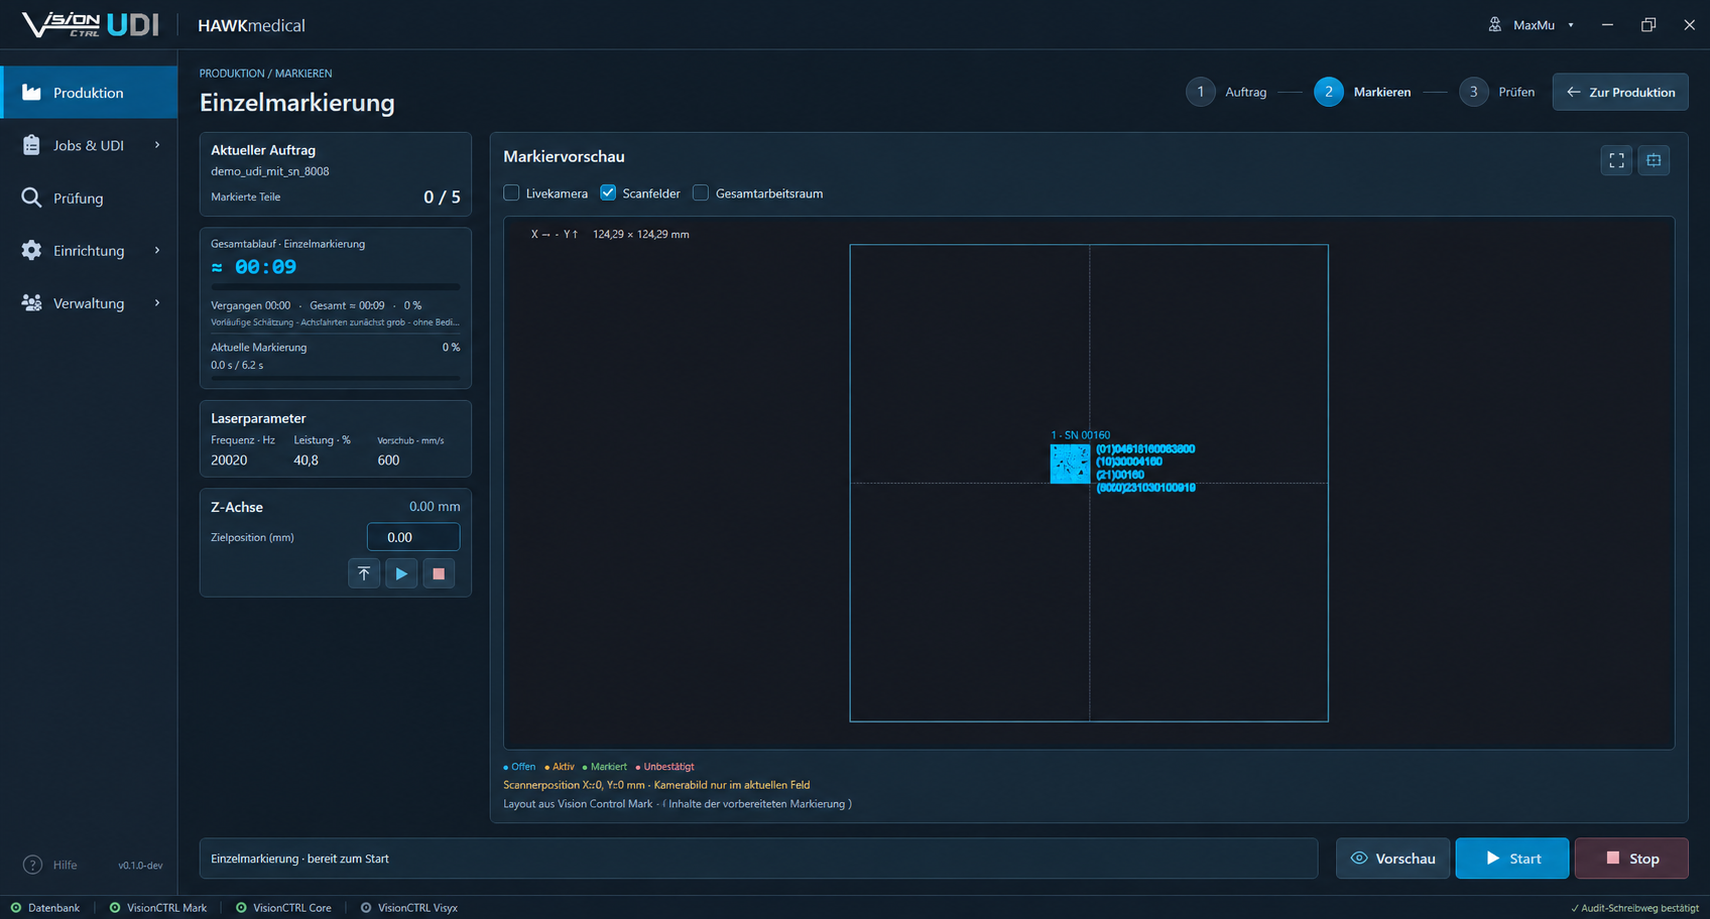
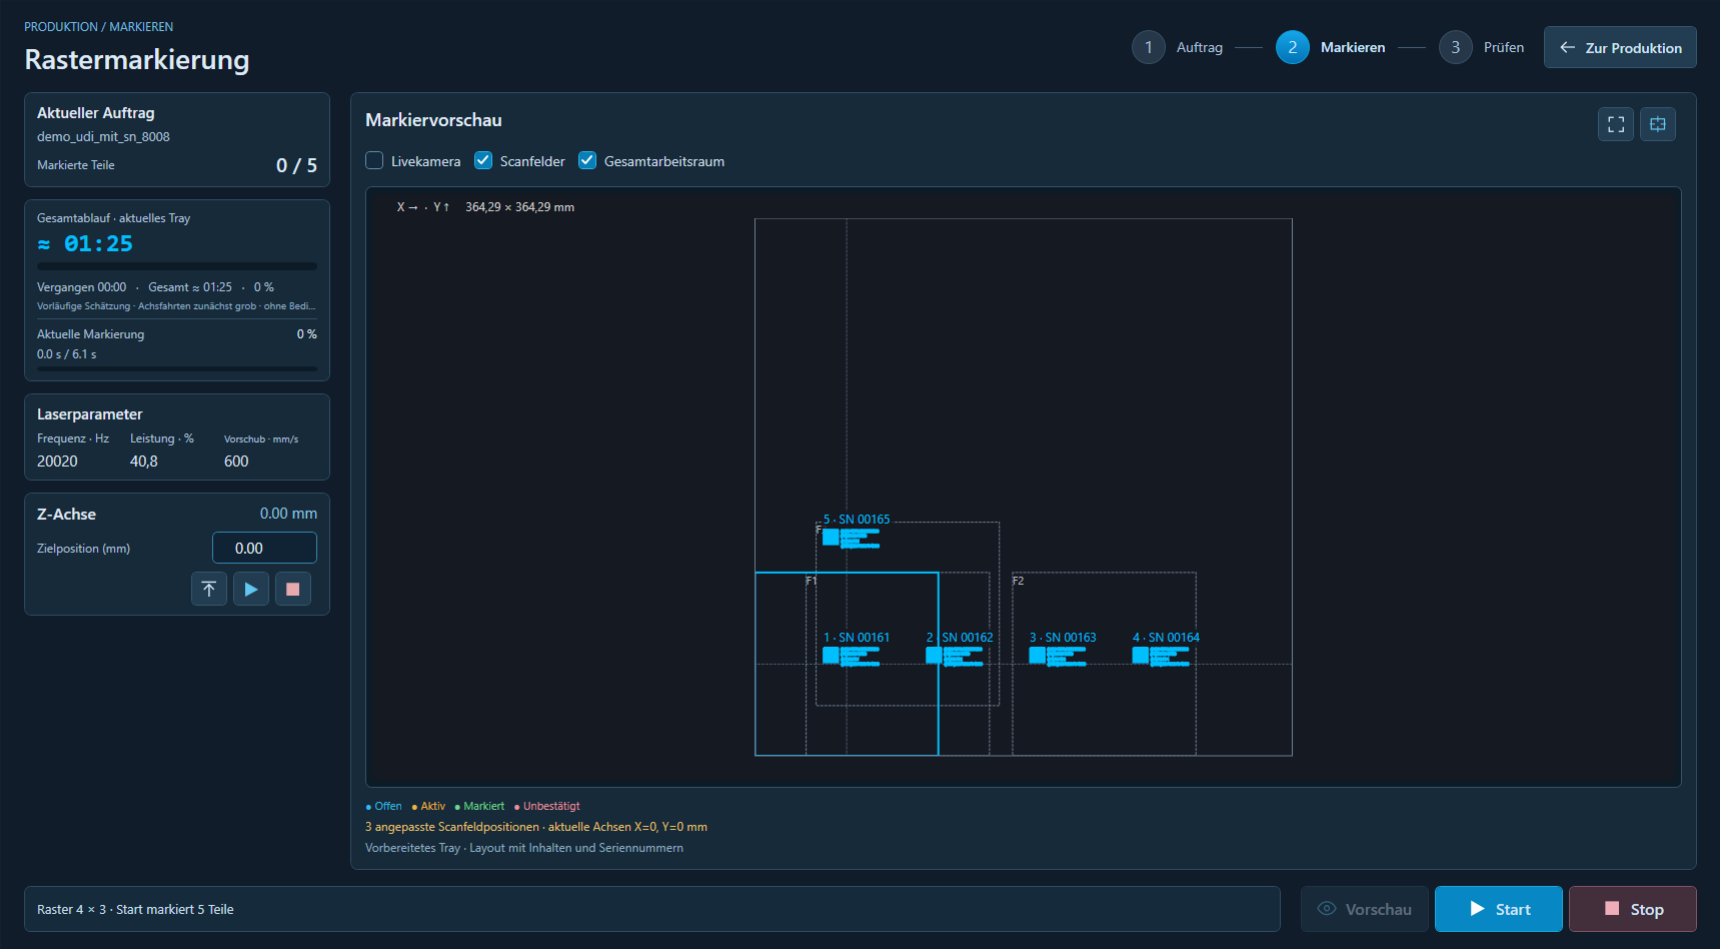
Mark individual parts within the scan field or multiple parts in a grid. Check positions, content and serial numbers in the preview before marking.
05

Inspect the marking

Assess DataMatrix content and image quality. Use OCR to compare enabled text fields with the expected values for each workpiece.
06

Review the results

View inspection status, reports and field details. With logging and archiving enabled, document results for subsequent review.

Order and job mapping

Scan. Load. Ready to mark.

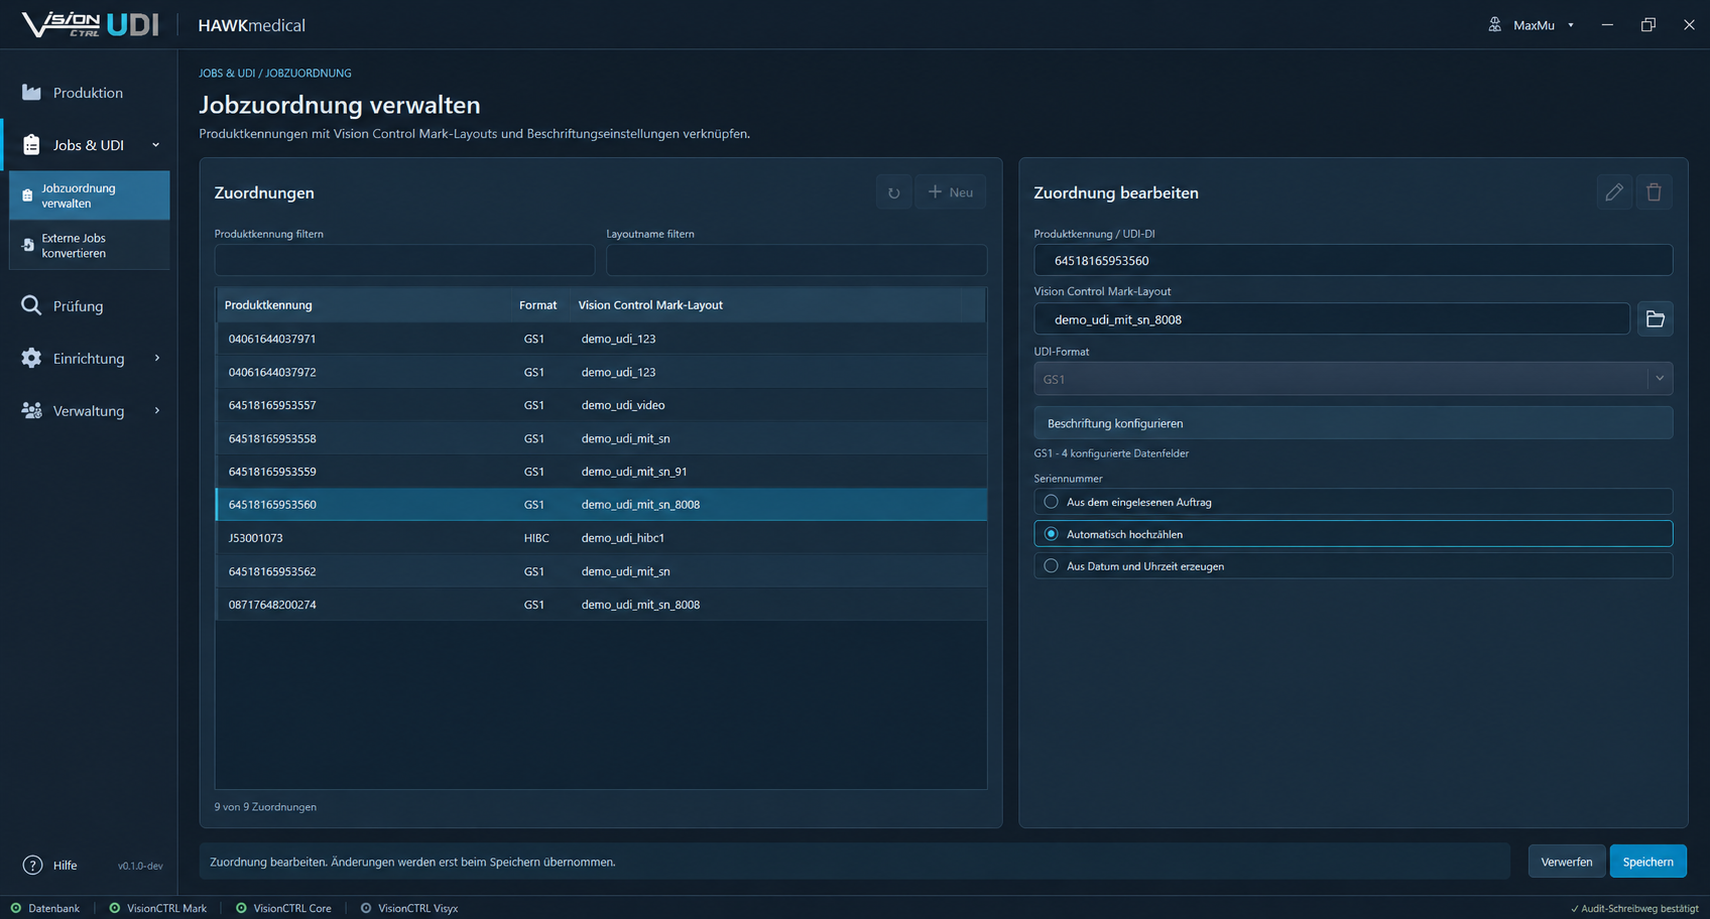
The scanned code supplies the order values. Database mapping links the device identifier, encoding system and marking job. The serial number option determines how variable content is generated.Once configured, job specifications are available for recurring orders.
Mapping the device identifier, encoding system and marking job
Mapping the device identifier, encoding system and marking job - click to enlarge

Flexible UDI configuration

GS1 and HIBC. Configured for your marking job.

GS1: assign content precisely

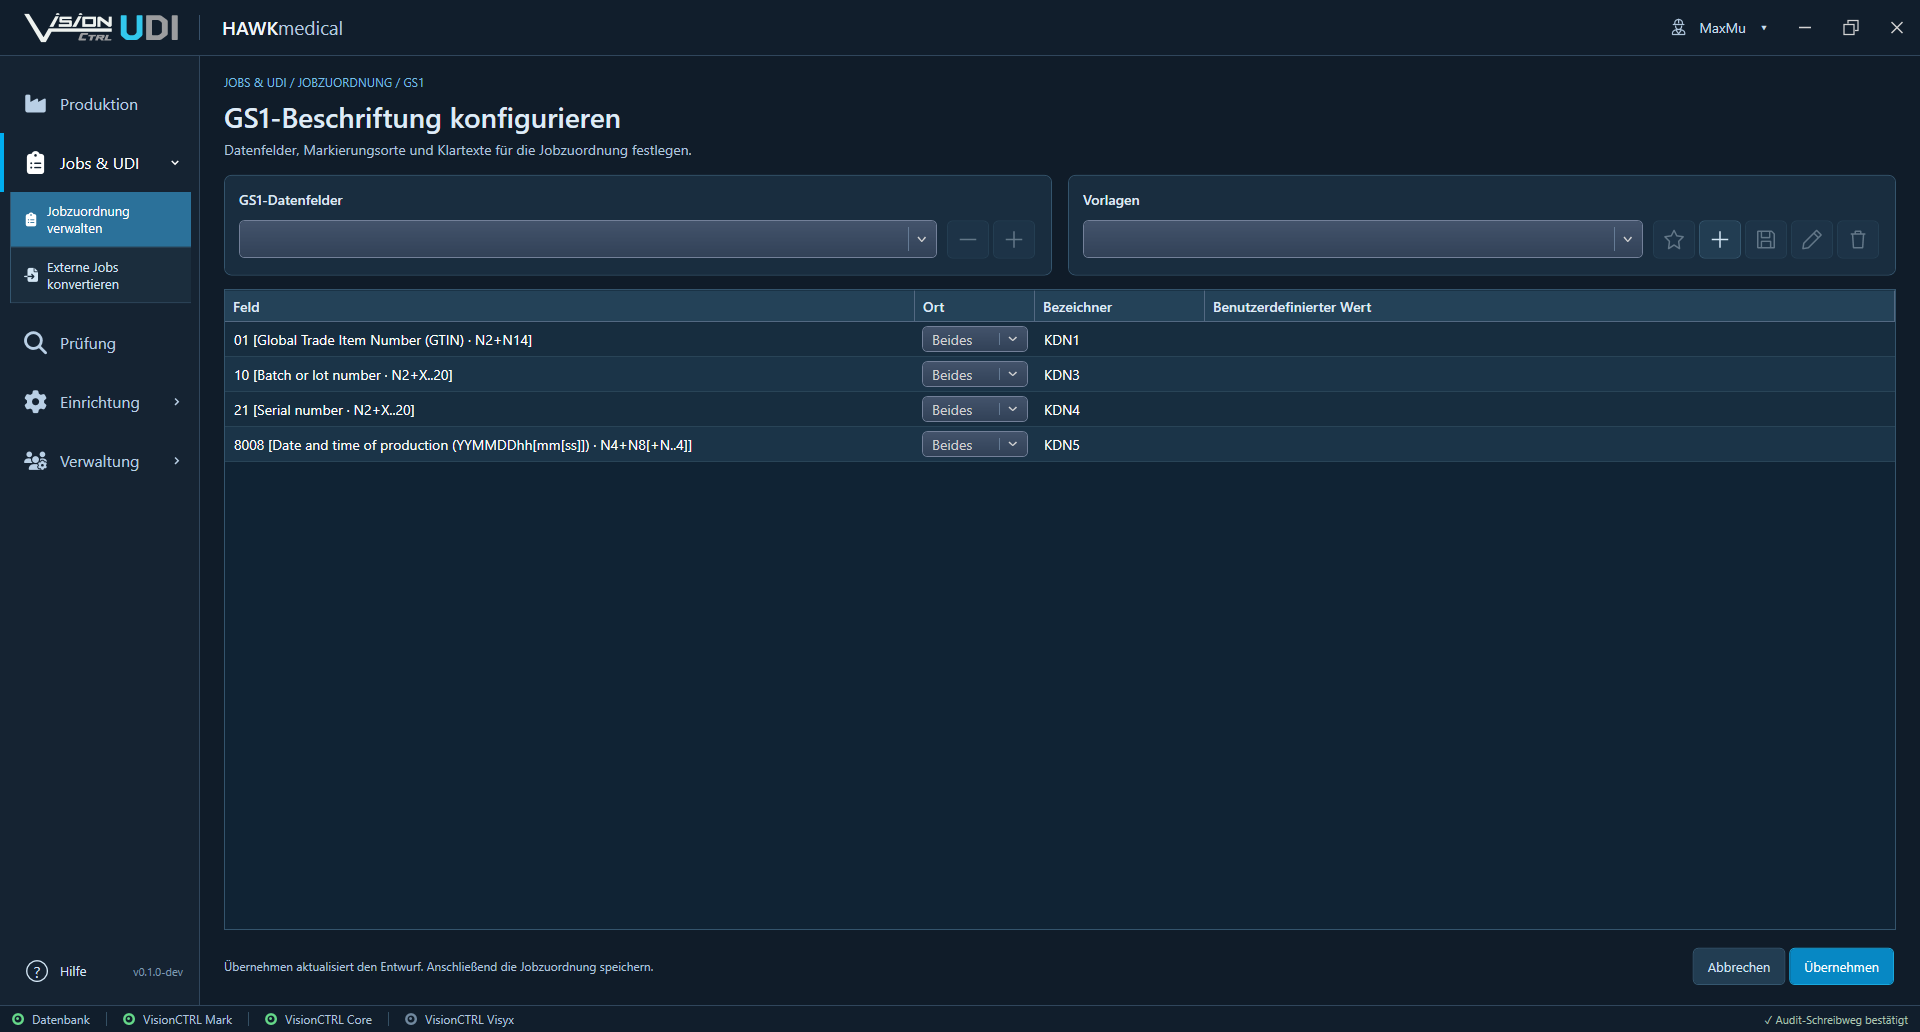
Select Application Identifiers, define their order and fixed values, and output each field as a DataMatrix code, human-readable text or both. Templates simplify recurring configurations. Content rules, check digits and required separators are taken into account.
GS1 configuration with information fields and templates
GS1 configuration with information fields and templates - click to enlarge

HIBC: configure the code structure clearly

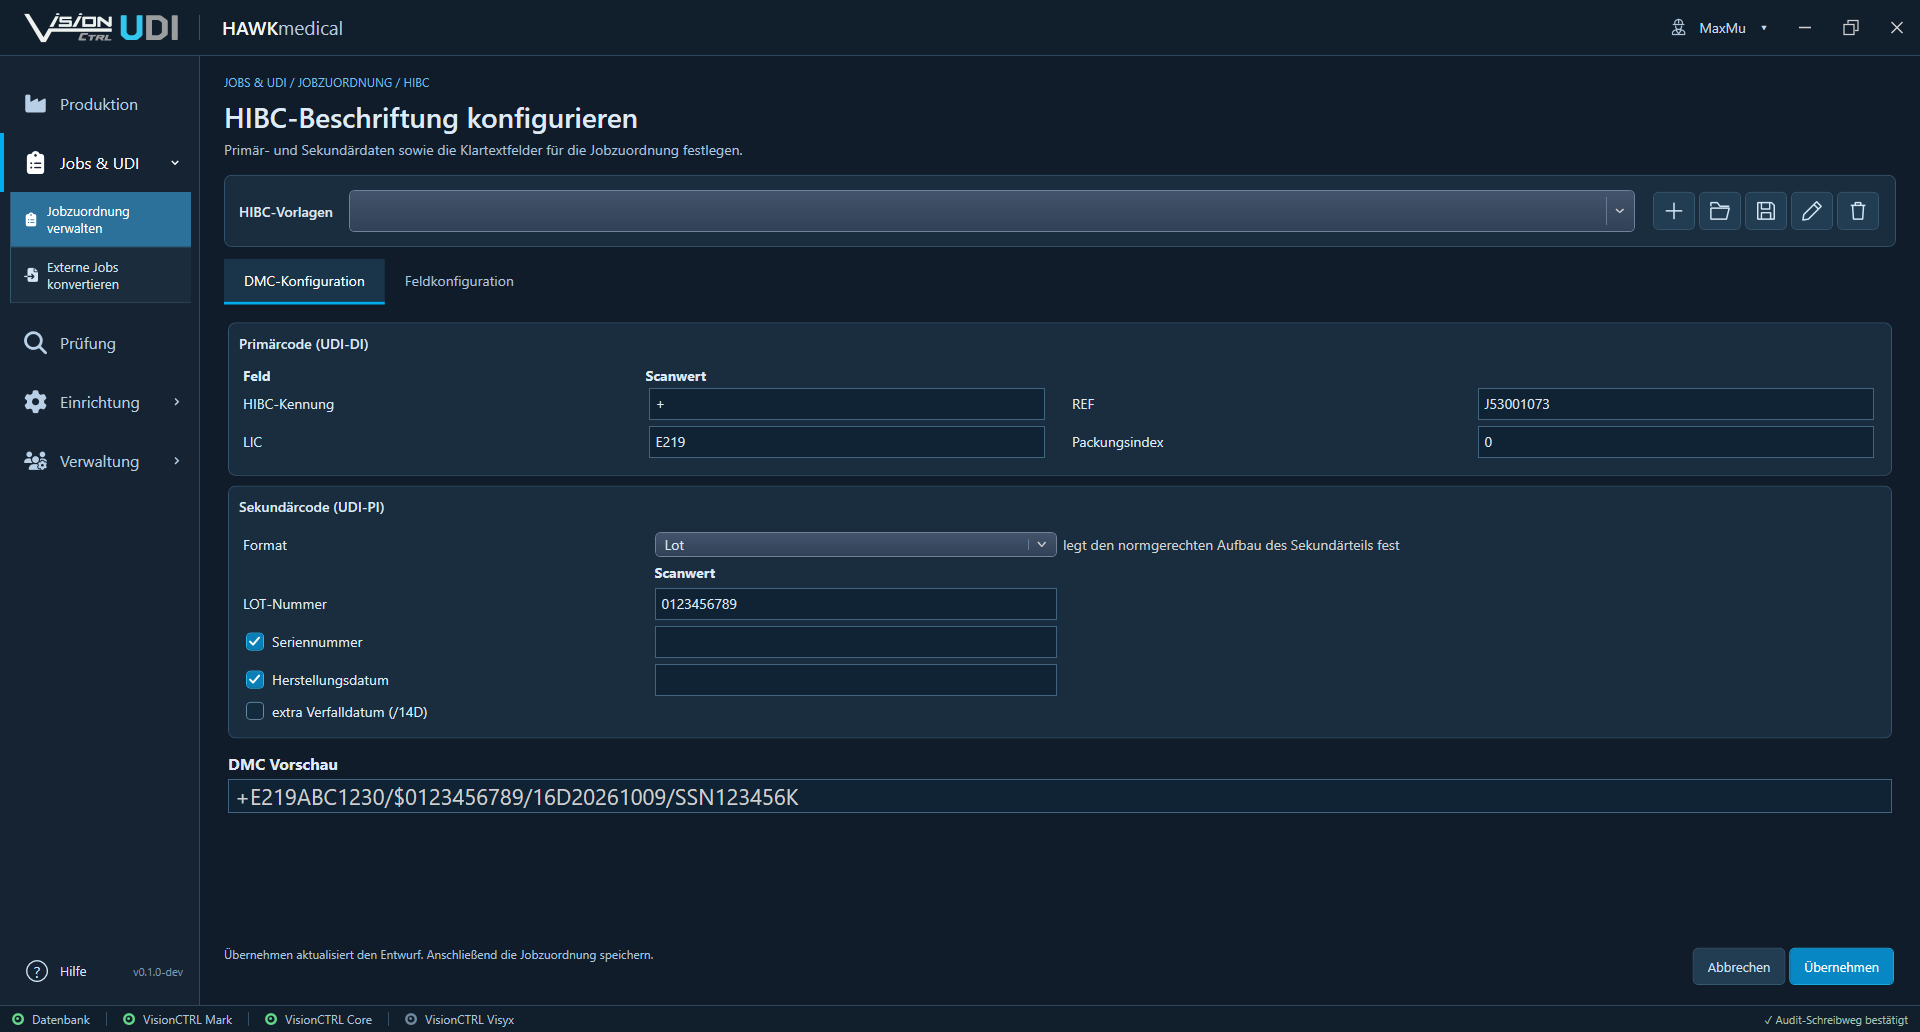
The labeler identification code (LIC), product identifier and packaging index form the primary data structure. Batch, serial number and date information supplement the secondary data structure. Configure the active fields and format, check the code structure in the DMC preview and assign content to marking objects.
HIBC configuration with primary and secondary data structures
HIBC configuration with primary and secondary data structures - click to enlarge

Vision Control Mark

Design the layout. Populate the content automatically.

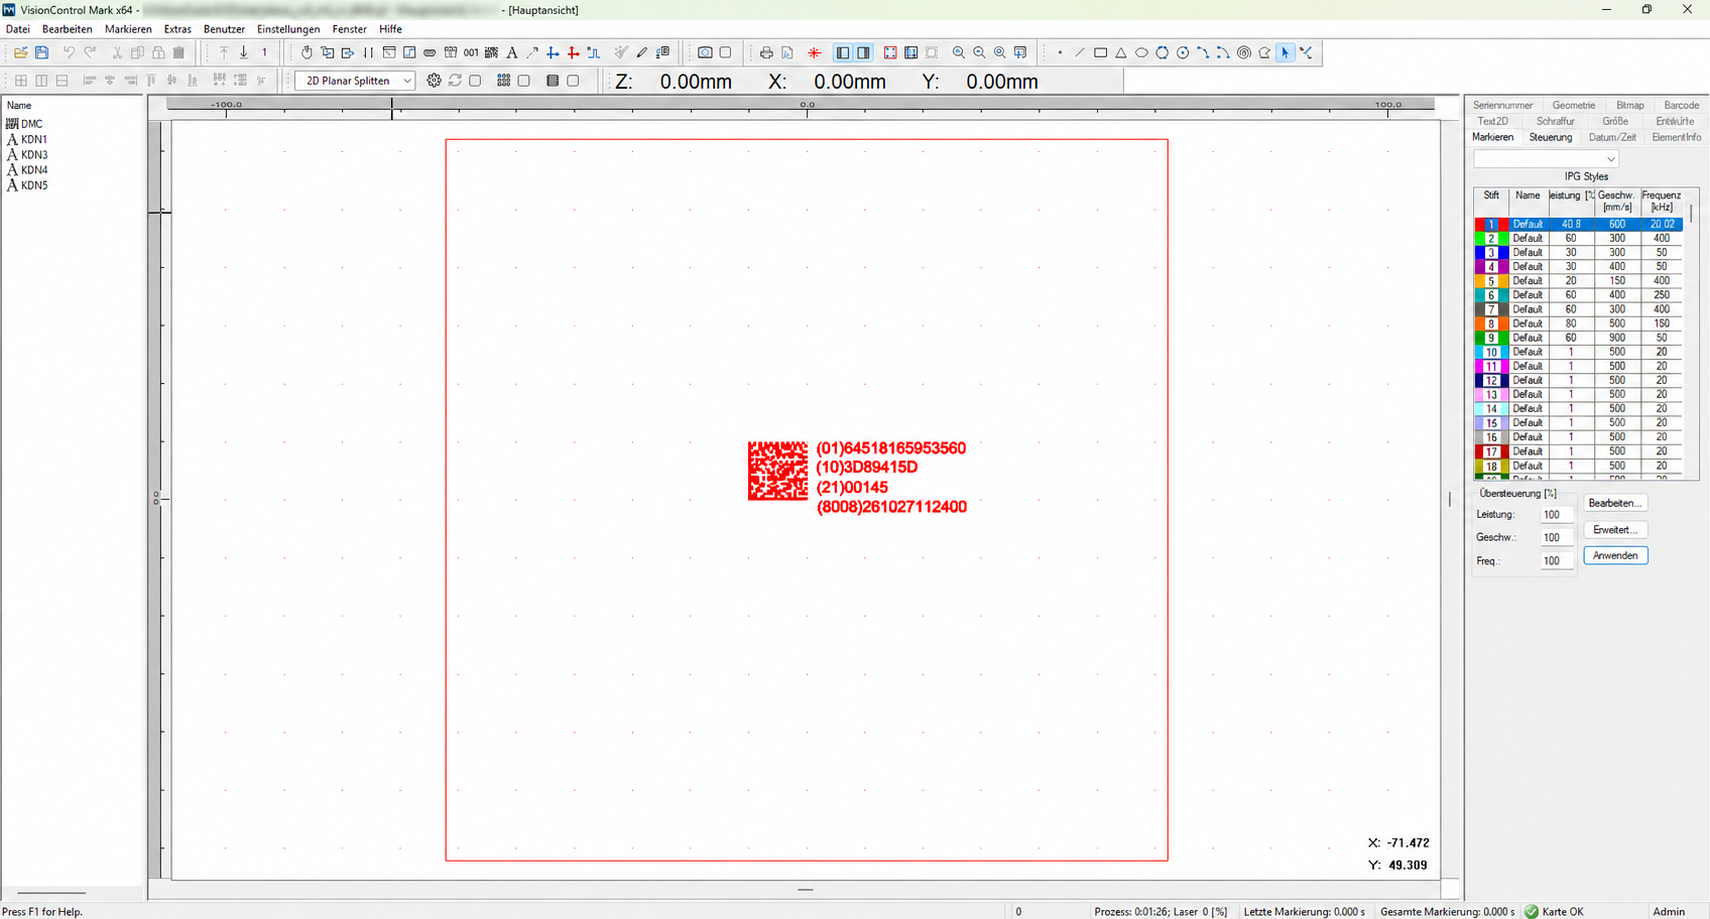
In Vision Control Mark, arrange DataMatrix codes, human-readable text and other layout objects within the scan field. Unique object names link the layout fields to the UDI configuration. Use parameter profiles to set power, speed and frequency for the marking task.VisionControlUDI loads the assigned job and transfers the variable content. Separating the prepared layout from changing order data makes recurring marking tasks clear and reduces manual input during production.
Vision Control Mark with DataMatrix, dynamic text fields and laser parameters
Vision Control Mark with DataMatrix, dynamic text fields and laser parameters - click to enlarge

From individual parts to series production
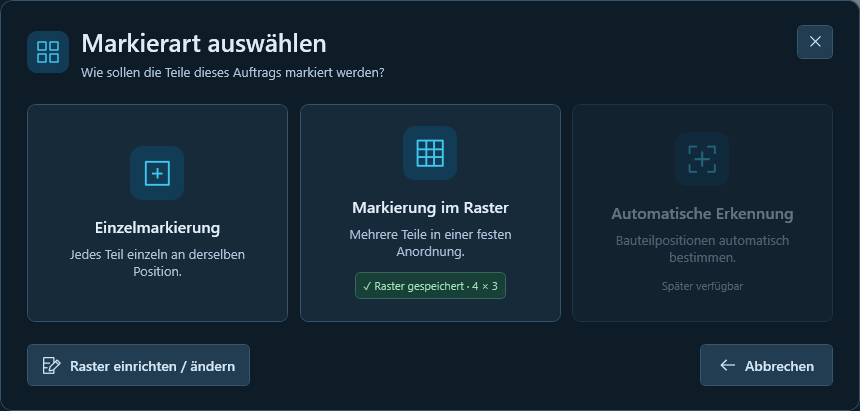
Individual and grid marking at a glance.

Rows, columns and spacing define your grid. Saved grids can be reused and adjusted as required. The configured X/Y working area can cover multiple scan fields.Each part retains its expected values. Images captured for each field are evaluated by position; the overall view brings together the enabled DMC and OCR inspections, with access to field details.
Selecting individual marking or grid marking
Selecting individual marking or grid marking - click to enlarge
Individual marking with workpiece-specific marking content
Individual marking with workpiece-specific marking content - click to enlarge
Multiple-part marking with grid positions and serial numbers
Multiple-part marking with grid positions and serial numbers - click to enlarge

Camera-based quality inspection

Read the code. Compare the text. Assign the results.

Inspect the DataMatrix code

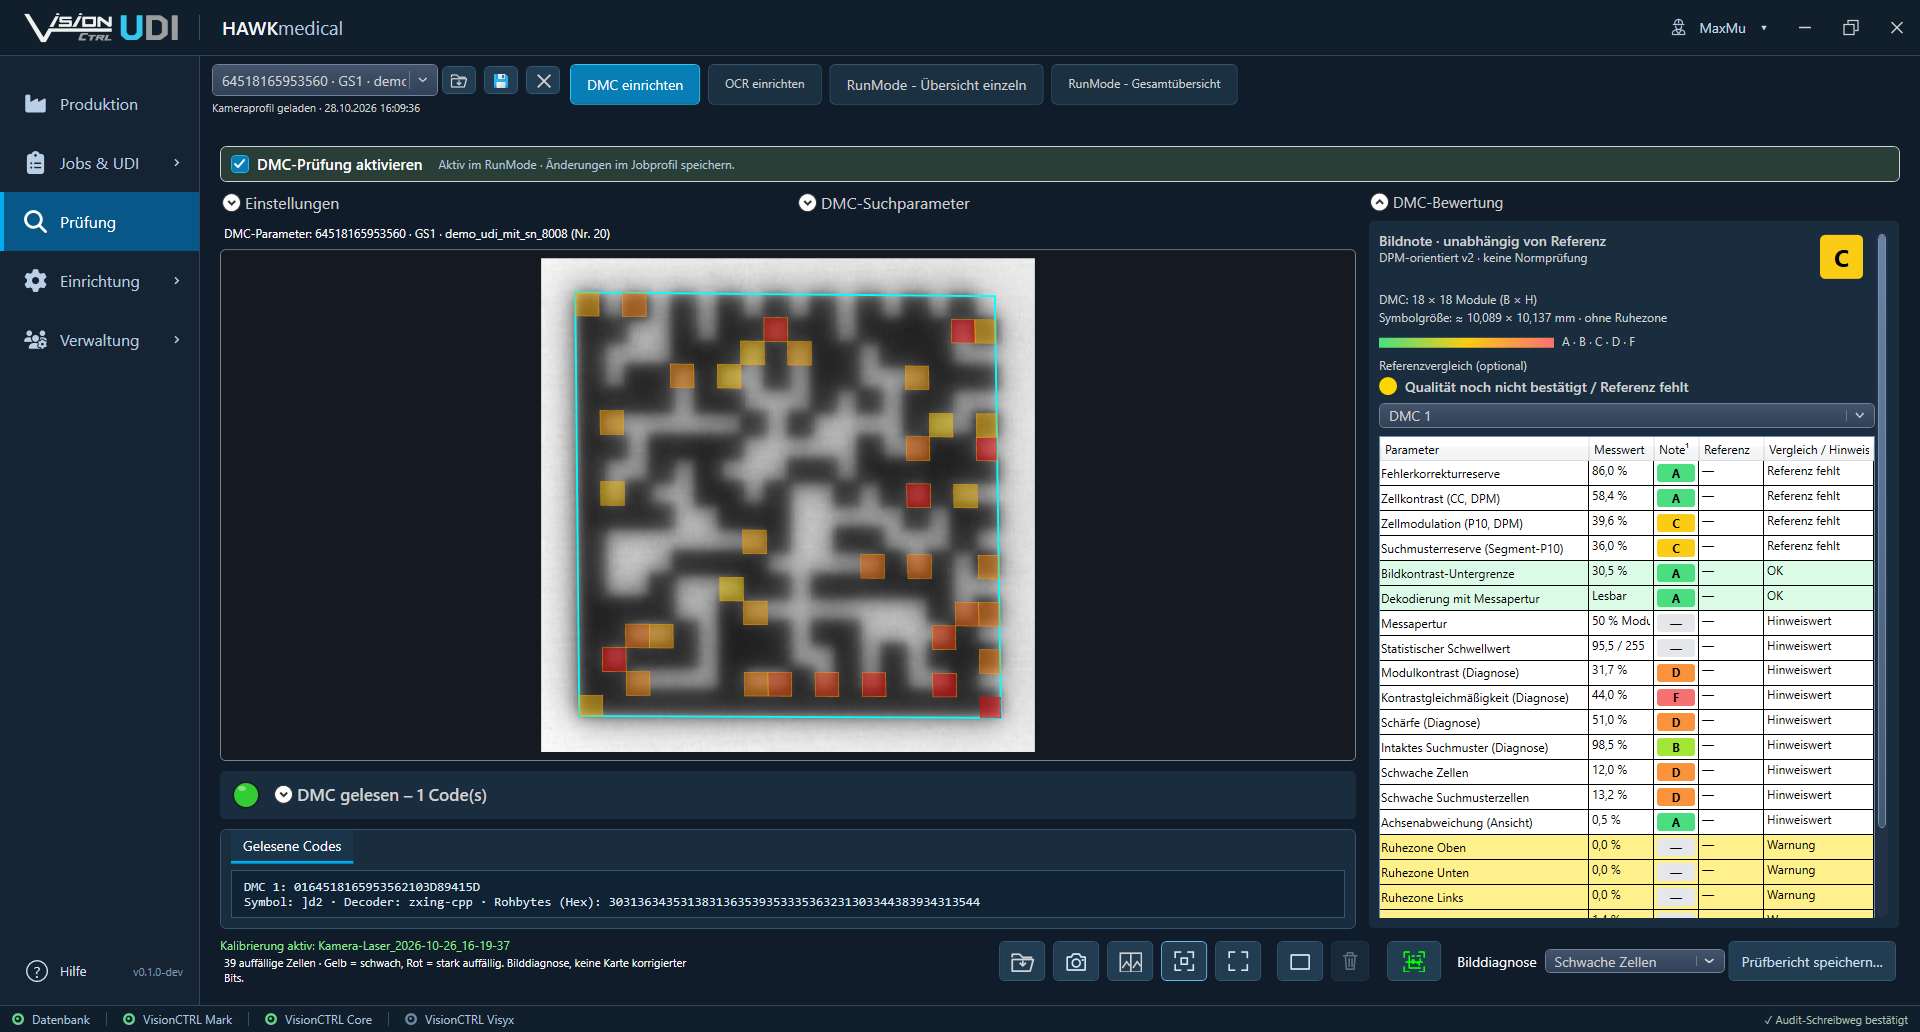
Configure search parameters and inspection requirements for each job. Assess detected codes, the internal image grade and individual quality characteristics together. With database logging enabled, DMC read data, quality values, expected/actual comparisons and the marking reference are stored.
DMC inspection with code image, internal image grade and quality characteristics
DMC inspection with code image, internal image grade and quality characteristics - click to enlarge

Inspect human-readable text with OCR

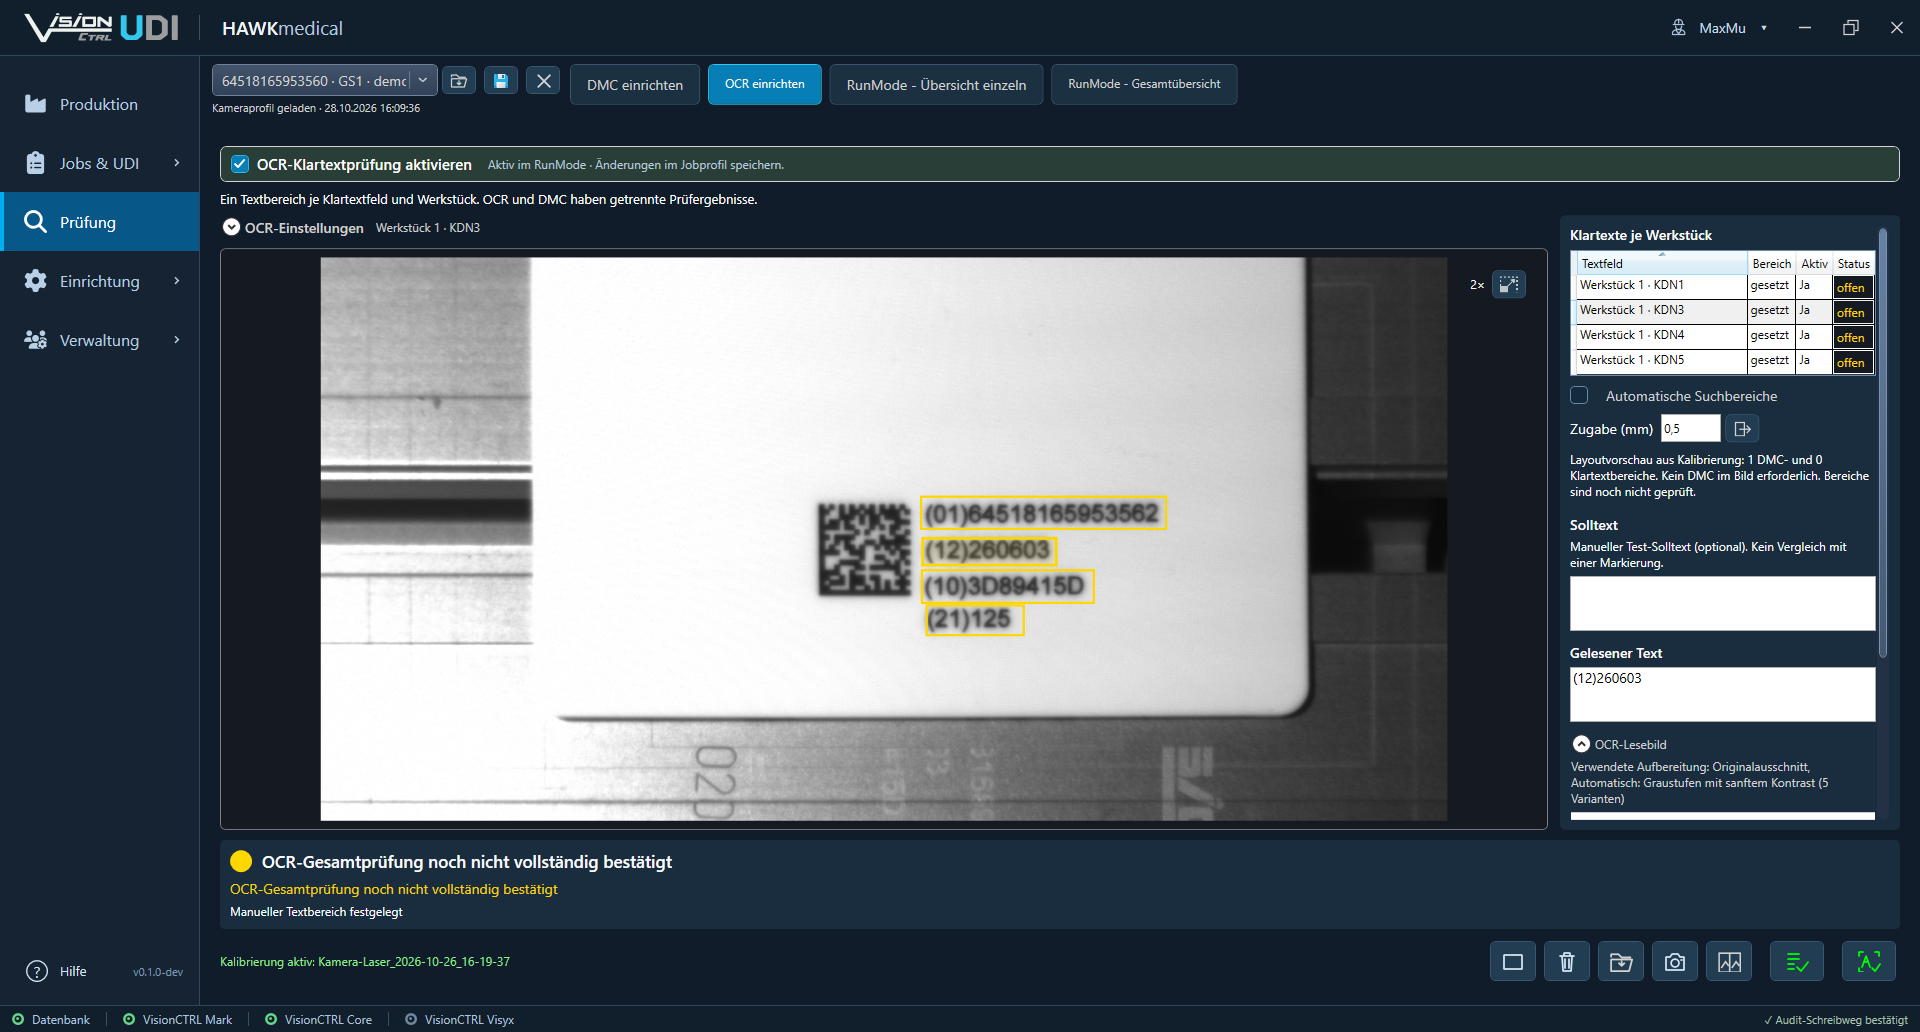
Assign each enabled text field to the workpiece. Highlighted image areas and field details show the recognised text, match result and OCR confidence. All enabled fields must pass inspection. With archiving enabled, OCR details and the combined overall status are documented in the field archive.
OCR inspection with highlighted text fields and expected/actual comparison
OCR inspection with highlighted text fields and expected/actual comparison - click to enlarge

Understanding the quality assessment: The internal DPM-oriented assessment is based on AIM DPM / ISO/IEC 29158. It does not constitute full verification against the standard. Image files are stored in reports or in the archive.

Reuse existing work
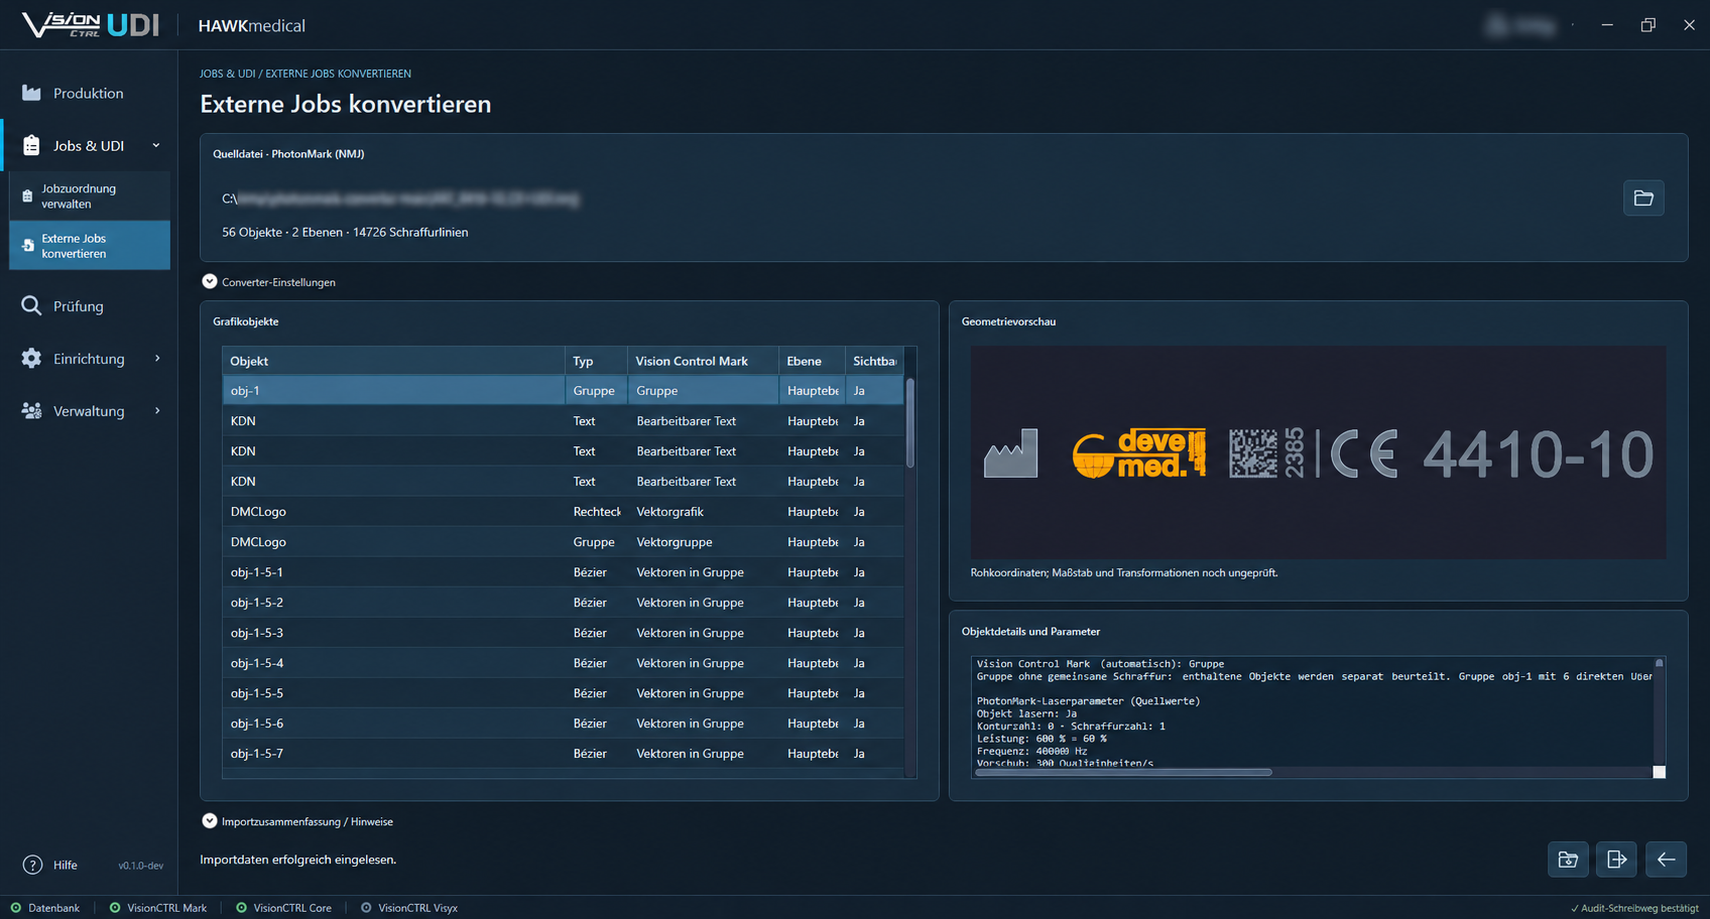
Import existing jobs from other systems.

Import NMJ jobs, review geometry and parameters, and convert them to SJF for Vision Control Mark. Supported text and GS1 DataMatrix codes remain editable; other content is imported as vectors.The object list, geometry preview and import summary show the planned import. A conversion report documents mappings and limitations.
NMJ import with object list, geometry preview and import summary
NMJ import with object list, geometry preview and import summary - click to enlarge

Organise your operations

Manage. Back up. Trace.

Users & permissions

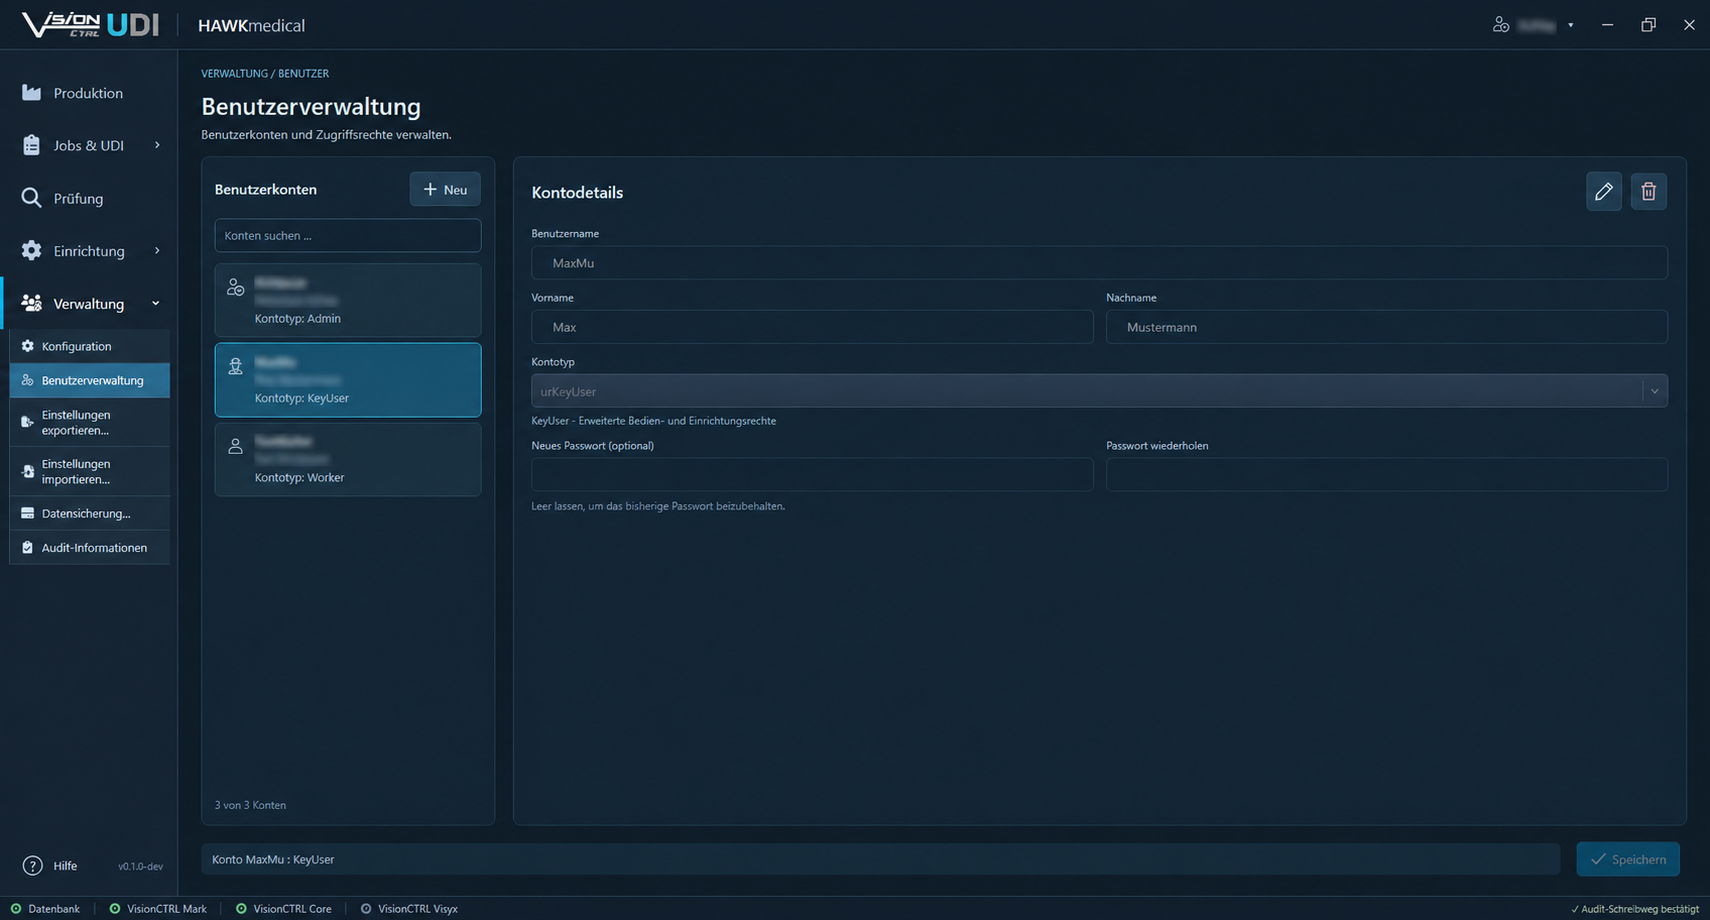
Manage user accounts and permission levels. Login and user switching associate operations with the operator; administrative functions are restricted accordingly.
User management and permission levels
User management and permission levels - click to enlarge

Backup & data exchange

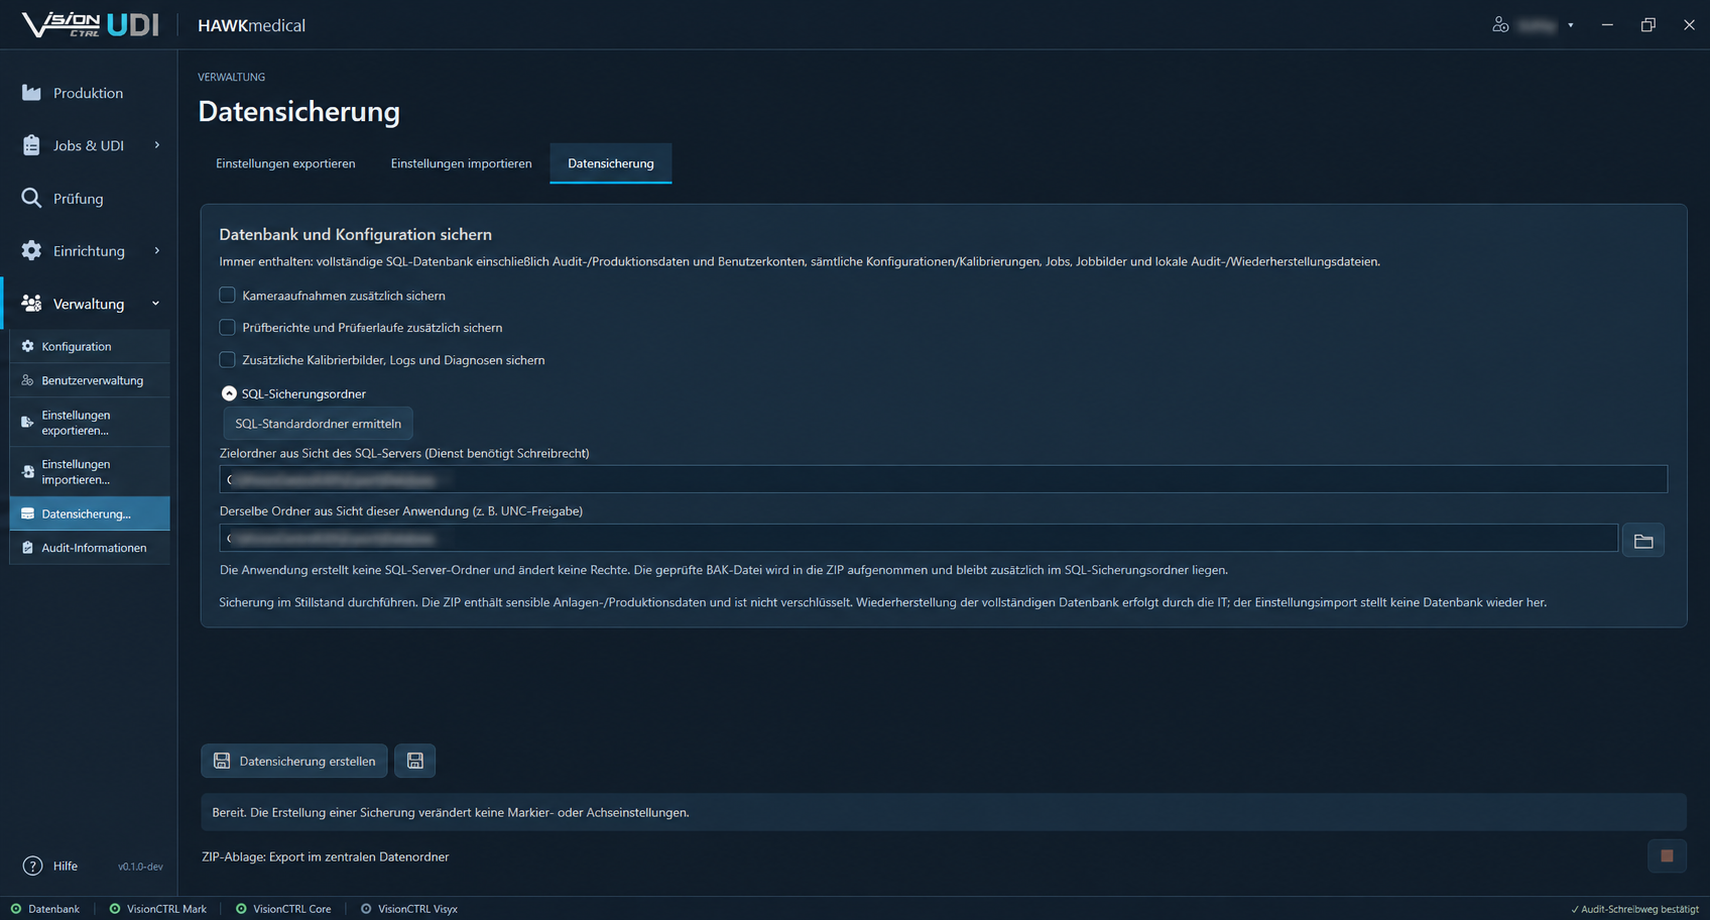
Back up the SQL database and configuration, adding camera images and inspection reports as required. Transfer jobs, UDI configurations, camera and grid profiles, and settings.
Backup for the database, configuration and inspection reports
Backup for the database, configuration and inspection reports - click to enlarge

Audit logging

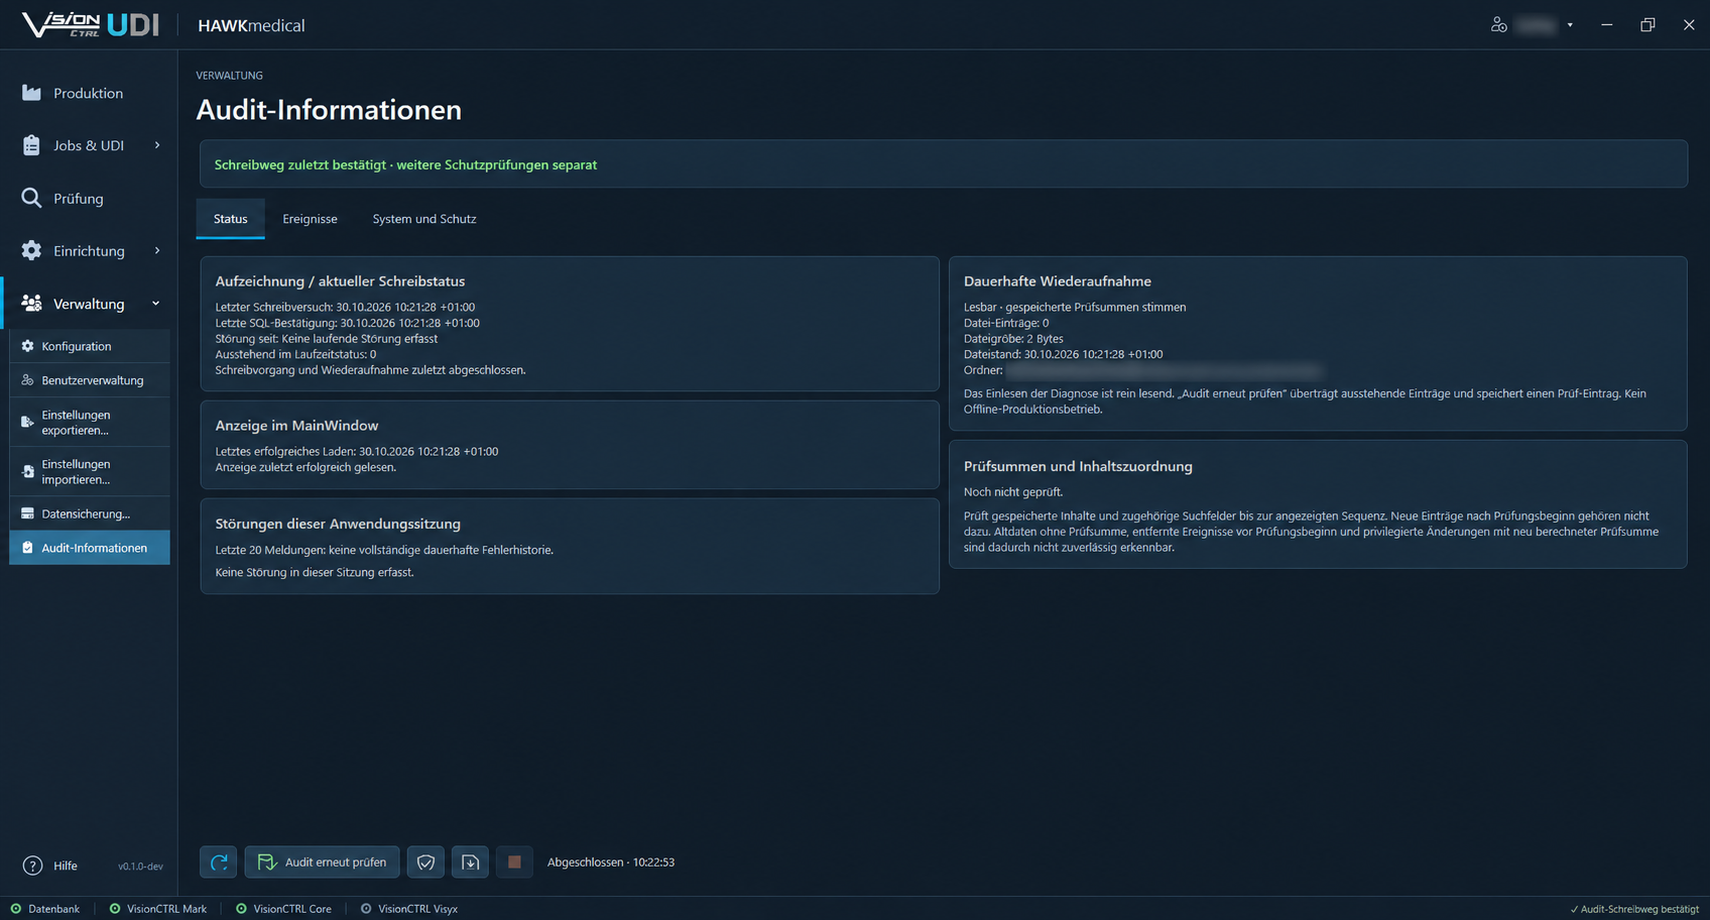
Filter events, view details and write status, and check checksums for diagnostic purposes. The audit trail is being expanded in stages.
Audit information with write status and event overview
Audit information with write status and event overview - click to enlarge

Setup tools

Align the camera and laser.

Adjust the lens

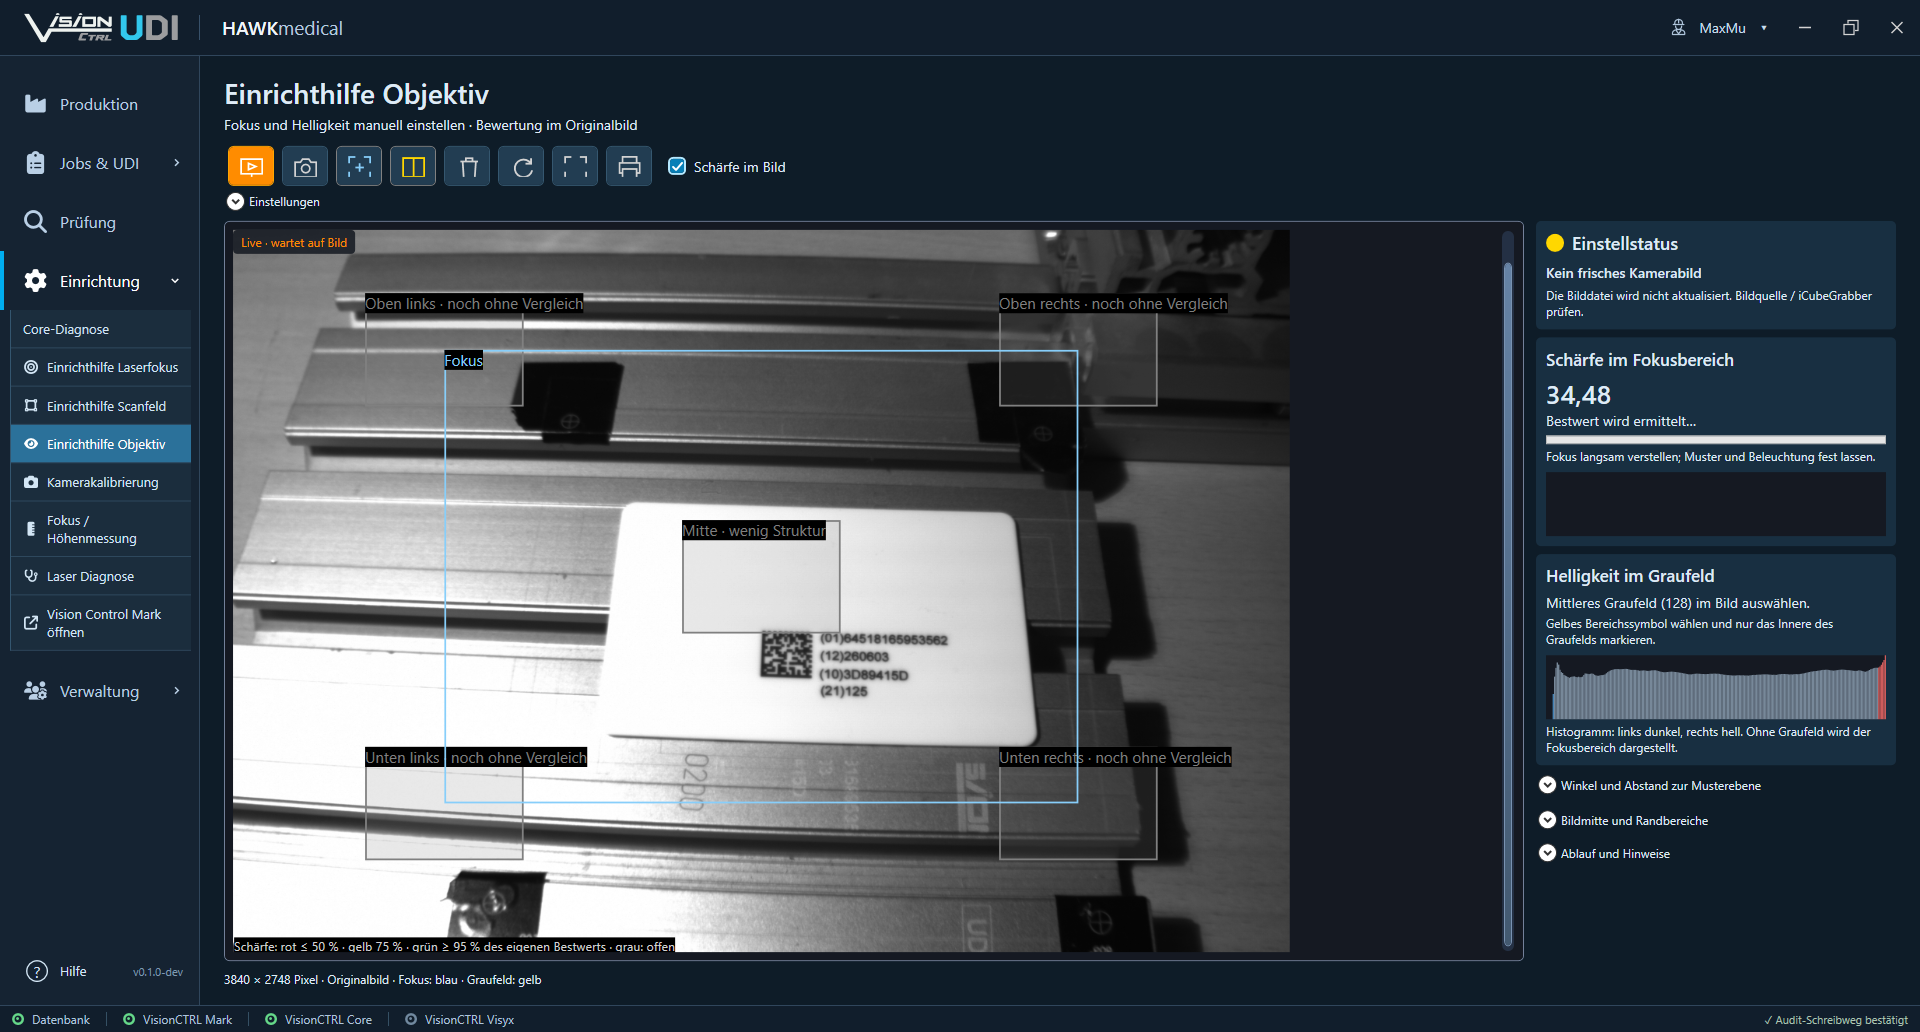
Manually adjust focus and brightness using the camera image. The sharpness indicator, grey field and histogram support image assessment.
Camera setup tool for focus, brightness and image assessment
Camera setup tool for focus, brightness and image assessment - click to enlarge

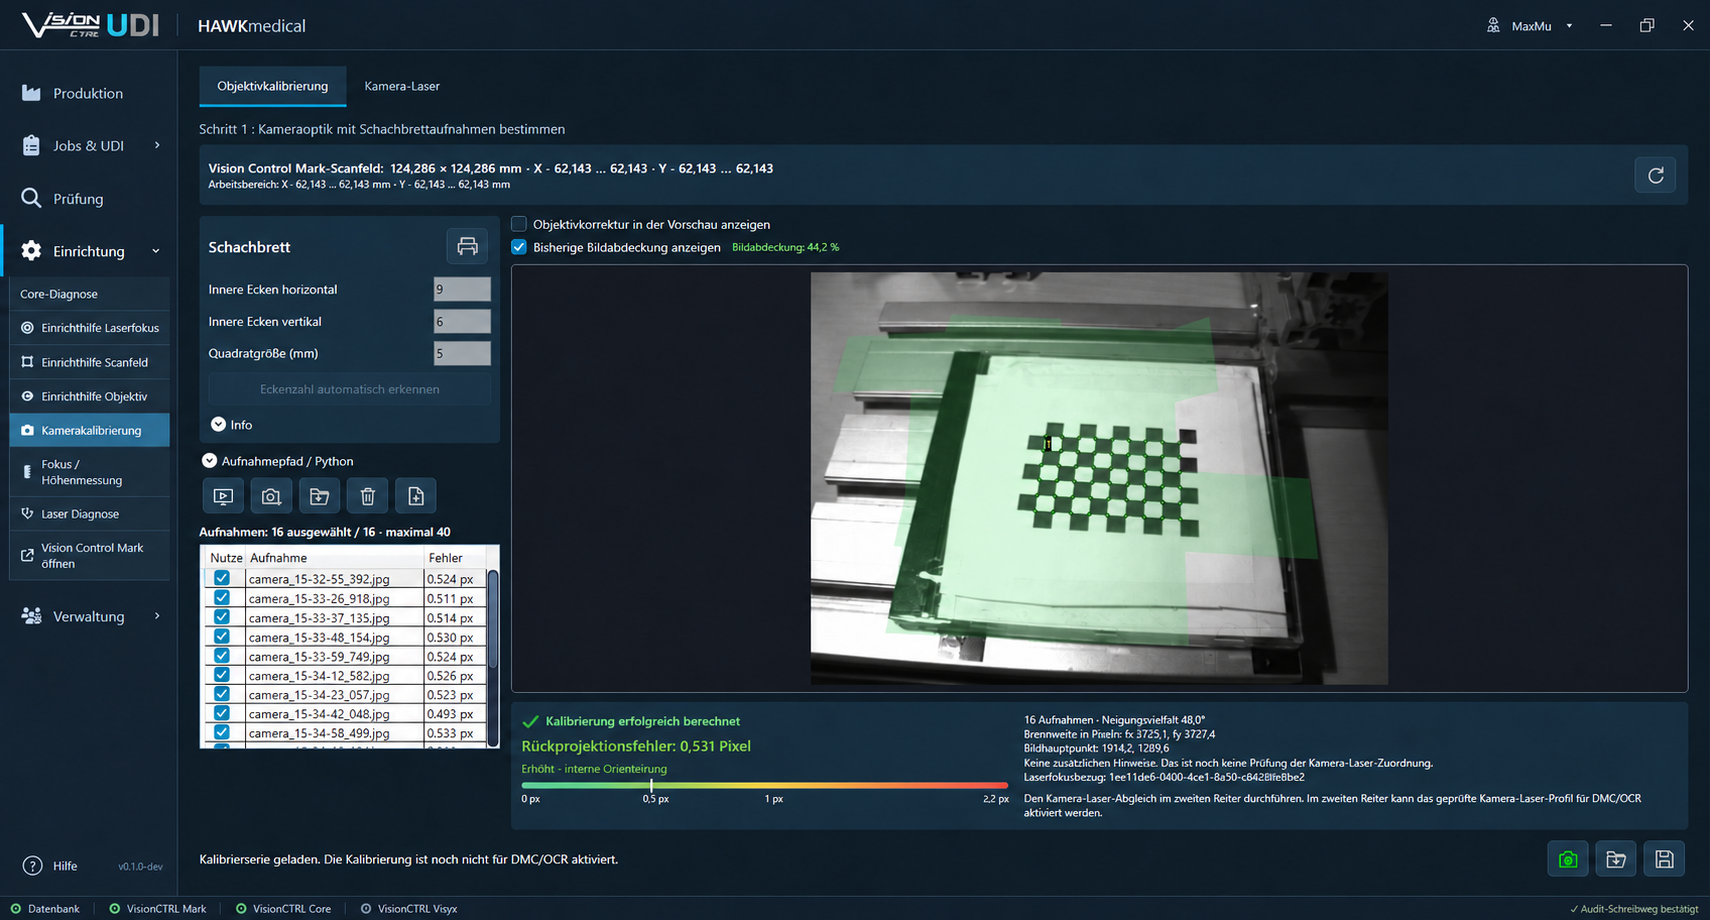
Calibrate the lens

Calibrate the camera optics using checkerboard images. Assess distortion, image coverage and reprojection error, then save the calibration.
Lens calibration using checkerboard images
Lens calibration using checkerboard images - click to enlarge

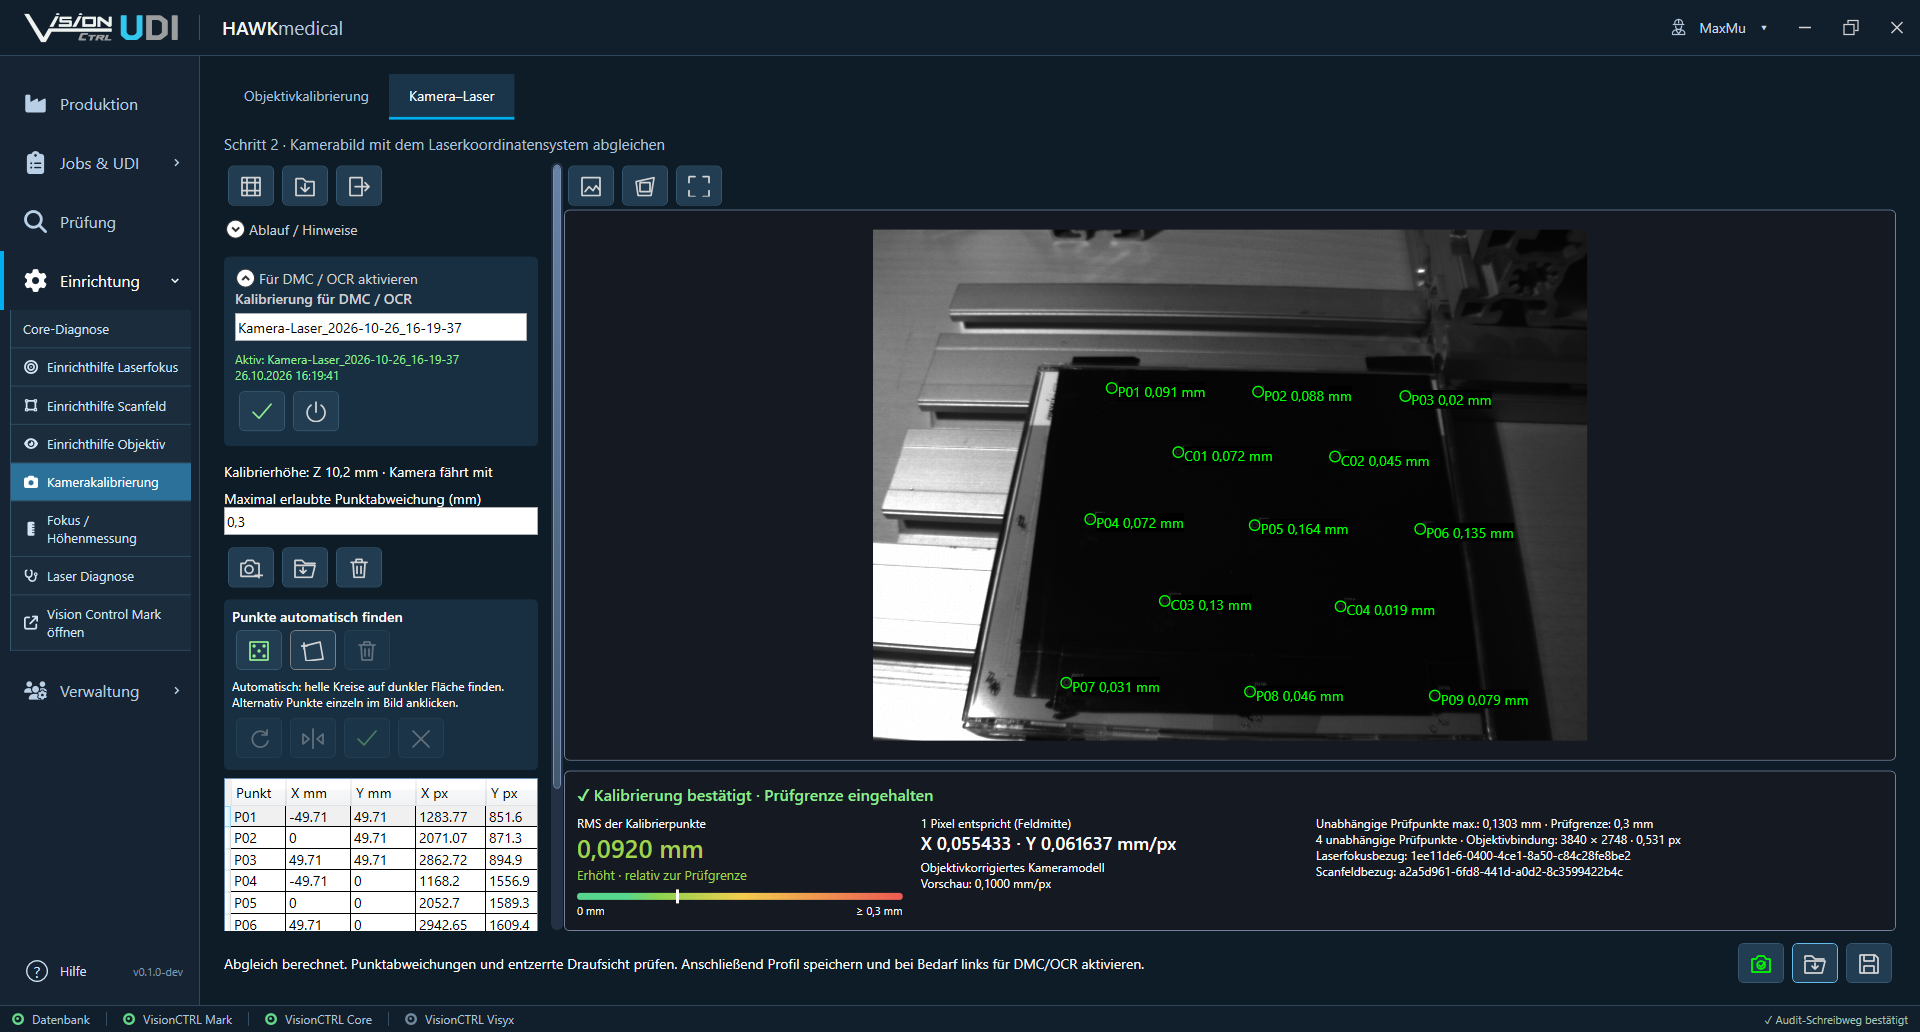
Map the camera to the laser

Link the camera image and laser coordinates using reference points, check deviations with independent check points and activate the profile for DMC/OCR.
Camera-to-laser calibration with reference points and check points
Camera-to-laser calibration with reference points and check points - click to enlarge

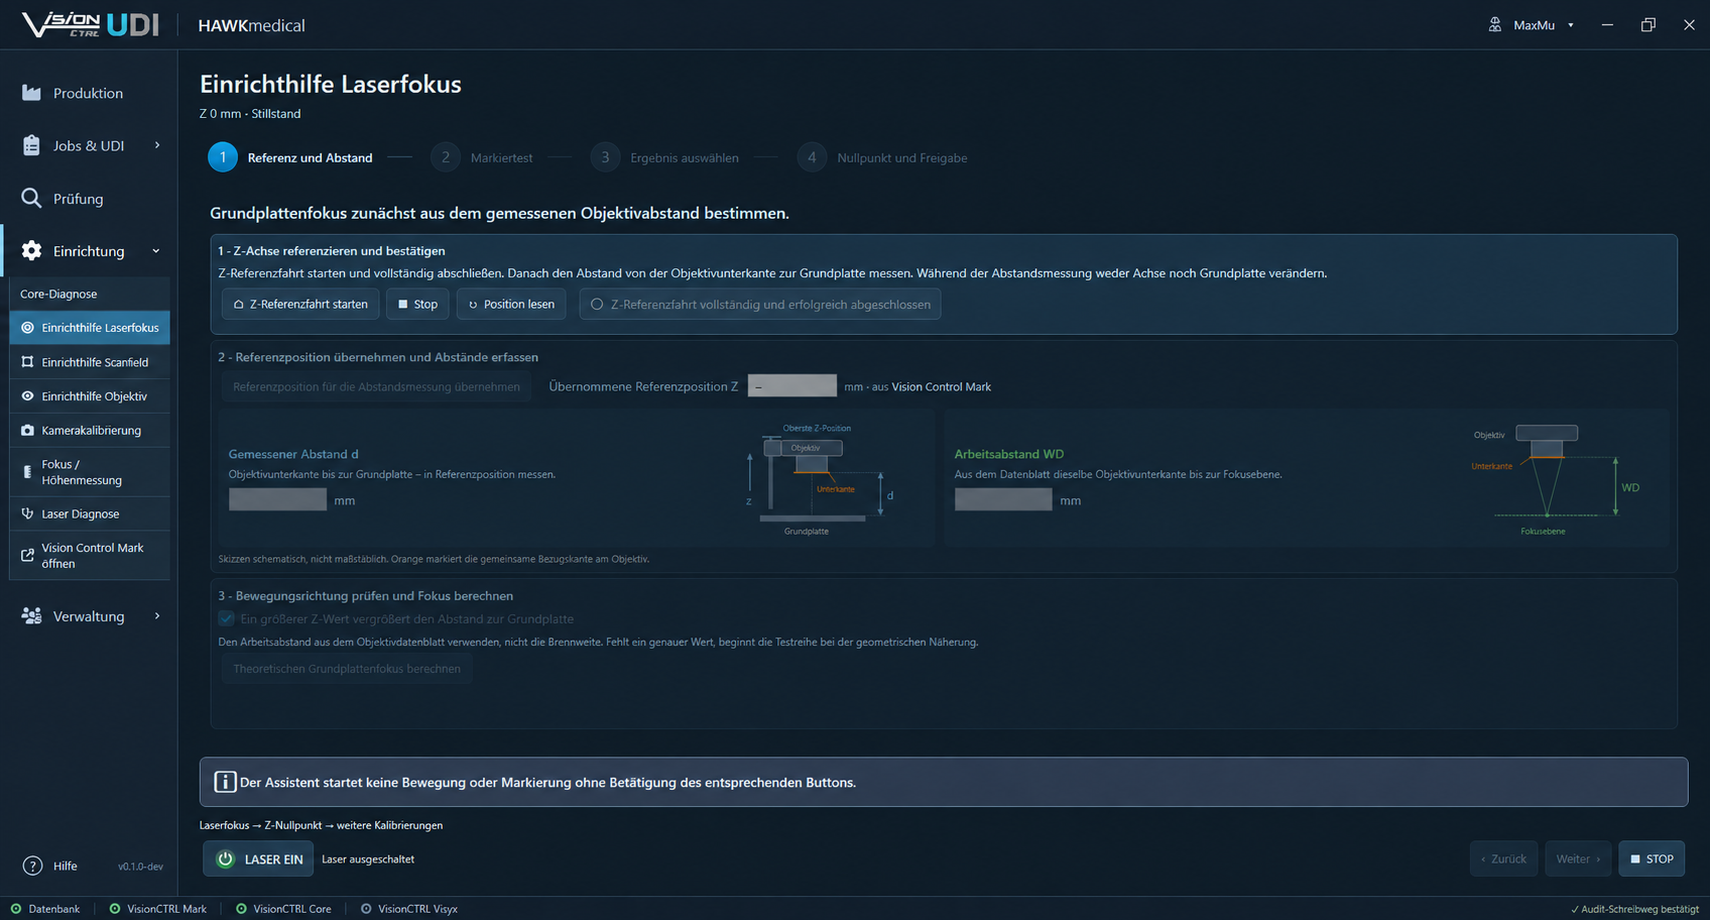
Set up the laser focus

A guided workflow supports homing, test marking and focus selection. Apply and check the validated Z zero point, then release it with a logged record.
Guided laser focus setup tool
Guided laser focus setup tool - click to enlarge

Good to know

Which data can be used for UDI marking?In addition to the device identifier, batch, serial number and date information can be included in the code and human-readable text, depending on the configuration. The mapping is configured for each job.
Does the software already detect workpieces automatically?Automatic object detection is a planned feature and is currently disabled. Individual marking and saved grids are currently available.
What needs to be considered when using HIBC grids?HIBC grids with a fixed scanned serial number require an extension to the serial number assignment function. The appropriate configuration should be agreed before use.
How are inspection results stored?DMC read data, quality values and expected/actual comparisons are stored when database logging is enabled. OCR details and the combined overall status are documented in the field archive when archiving is enabled.

Your UDI task. One coordinated workflow.

Would you like to bring together order data, laser marking and inspection for your medical devices? Let us review your identification task together - from encoding and serial number assignment to workpiece positioning and result documentation.Talk to Vision about HAWKmedical and VisionControlUDI.

Let’s discuss your project

Tell us briefly what you need. Our team will get in touch with you.

Your enquiry about:HAWKmedical Software

Required fields are marked with *.


    We use your details to respond to your enquiry. Privacy policy